This documentation will walk you through how to configure the Menu Links Majix Content Plugin.
We also give you some examples of how this plugin can be used.
Configuring the Plugin Parameters
Messages

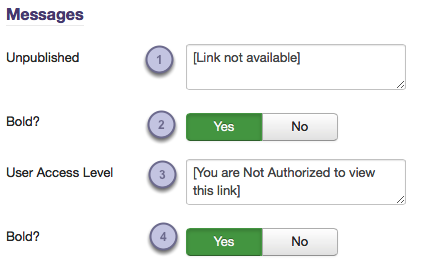
Measages are used to inform users when links are not available either because the menu is unplublished, or the users access level does not allow them to view the link.
(We added the messages so that if a link is unavailable, the user wouldn't see just a blank space and get confused)
There are 2 settings for each message type:
- The message text for an unpublished link
- Choose if you'd like the message text to display as bold
- The message text if the user doesn't have access to view a link
- Choose if you'd like the message text to display as bold
Default Options

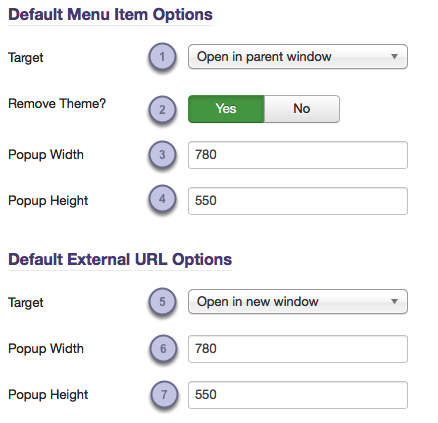
Items 1-4 are configurable for all links that are internal menu items.
- Target: Choose the target location of the link (same, new, popup, modal, rokbox)
- Remove Theme?: This will add the "tmpl=component" parameter to the url which will cause the page to be displayed without the template design. (this is only available for popup, modal style windows)
- Popup Width: This is the default window width of all popup and modal style windows
- Popup Height: This is the default window height of all popup and modal style windows
While items 5-7 are configurable for all links that are external url's.
- Target: Choose the target location of the link (same, new, popup, modal, rokbox)
- Popup Width: This is the default window width of all popup and modal style windows
- Popup Height: This is the default window height of all popup and modal style windows
Allowed Labels
The following labels can be used:
- id (required)
- class (optional)
- icon (optional - Joomla! 3.2 and newer only)
- title (optional)
- target (optional - same, new, popup, modal, rokbox)
- width (optional - for use with popup or rokbox style window only)
- height (optional - for use with popup or rokbox style window only)
- tmpl (optional - bool 1 to remove the template design from a popup, rokbox or modal style window, 0 to keep the Joomla! template design)
Examples
Here are some examples of how to show the links/buttons in different ways.
Each example is first shown with the actual content plugin tag that was used to create the link/button, then we display an actual content link rendered as the link/button (spaces before and after { } were added only so we could display the code in the browser), followed by a list of the labels used and explained (if needed).
EXAMPLE ONE:
{ menulink id:366,title:product page }
Our first example is a link to the for this extension.
This is a simple example of creating a link. The only other label we used was 'title' so that we could change the link name from the actual menu title.
- Menu ID: 366
- Ttitle: product page
EXAMPLE TWO:
{ menulink id:366,class:btn }
This is a button example using a basic button class from the Bootstrap version included in Joomla! 3.3
- Menu ID: 366
- Class: btn
EXAMPLE THREE:
{ menulink id:366,class:btn btn-warning,title:My Custom Button,icon:icon-plus }
This is another button example using button classes from the Bootstrap version included in Joomla! 3.3, we also added an icon from the included Bootstrap (see the bottom of this docuement for more information on using icons)
- Menu ID: 366
- Class: btn btn-warning (our example uses classes found in Bootstrap, available in Joomla 3.2 and greater)
- Title: My Custom Button
- Icon: icon-plus (available in Joomla 3.2 and greater)
EXAMPLE FOUR:
{ menulink id:366,class:btn btn-primary,title:A Modal Example,target:rokbox }
This is a button example of a modal window. Since we have RokBox installed, we are using that for our example. RokBox is an extension developed by RocketTheme.
- Menu ID: 366
- Class: btn btn-warning (our example uses classes found in Bootstrap)
- Title: A Modal Example
- Target: rokbox
More About Adding Icons
At the time of writing this document, we couldn't find any definitive instruction from the folks at Joomla on how to use/include the icons found in the latest version of Joomla! or rather the version of Bootstrap found in Joomla! 3.2 & newer.
That being said, we have found these links to be helpful and have provided them for the time being:
- http://ma.tvtmarine.com/en/blog/112-joomla-icomoon-icons-directory
- http://kyleledbetter.com/jui/icons/
Please note that since these are external links, we have no control over their availablitiy on the web. If you find either link to be broken, please let us know.
This document was created using ScreenStepsfrom BlueMango Learning Systems, LLC
