Instructions to configure this module. A basic understanding of how to install a Joomla extension is needed.
Accessing the administrator modules:
Log in to the back-end administrator area of your Joomla website.
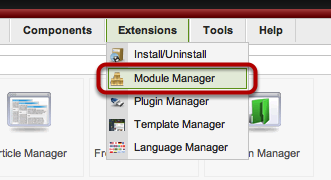
After you have installed the extension, Select the Module Manager from the Extensions Menu.
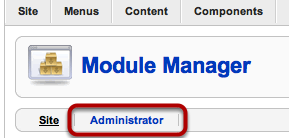
Select Administrator modules type.

Either edit the pre-installed module, or create a new module.
Configure the Parameters for a Quick Icon:
A quick icon is the icon shown in the cpanel admin area.
Select the 1) Module Type of 'Quick Icon'
(A quick icon is the icon shown in the cpanel admin area while the Tab/Divieder is a way to seperate groups of icons.)
2) Enter the label for the icon, what name will show in the cpanel.
You can use either a 3) Custom Icon, or a 4) System Icon from the Khepri Template.
You can either chose from an installed 5) component, or enter an absolute or relative 6) URL (see examples)
Choose the 7) Target Window where the link will open, either New Window or Parent Window (same or current window)
Select the 8) Access Level, who can see this quick icon in the cpanel.
Configure the Parameters for a Tab/Divider:
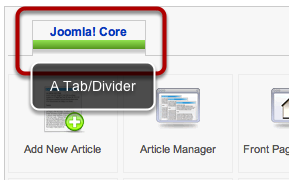
The Tab/Divider is a way to seperate groups of icons
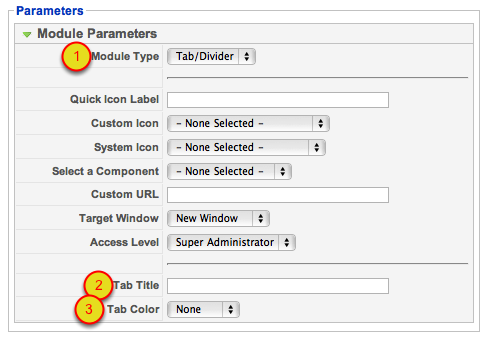
Select the 1) Module Type of 'Tab/Divider' (if you leave 'Tab Title' blank, "Joomla! Core" will be used)
Enter the 2) Tab Title, what name will show in the cpanel.
The 3) Tab Color can be None, Cherry, Green or Teal. The same color choices as the Khepri Template.
Configure the Details:
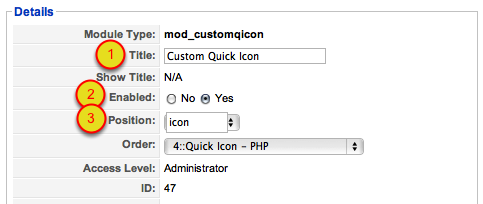
1) Enter a Title, the name of this module.
2) Set Enabled to 'yes'.
3) Position needs to be 'icon' for the quick icon to show in the cpanel.
Finish

Select 'Save'.
This tutorial was created using ScreenStepsfrom BlueMango Learning Systems.
